Hyper-V on the Windows client is a feature that we were all waiting for. In previous Windows 7, if we want to run Hyper-V in Windows 7, we need to install another tools to use that features. But, in new Windows 8, this features had already build-in for client.
By default this feature is not enabled, so you will need to do the following steps in order to activate Hyper-V on Windows 8 Client. Before you start, make sure that your machines supports Hardware Server Virtualization and that it has has been enabled in the BIOS.
Enable hyper-V features in Windows 8
1. From Windows 8 Metro UI, search for "Turn Windows features on or off" by typing "features". In search bar, click on Settings and click Turn Windows features on or off.
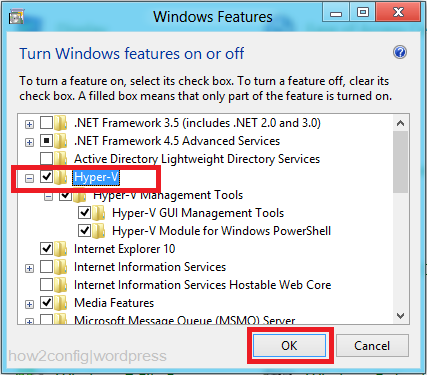
2. In Windows Features pop-up windows, select Hyper-V check-box and click OK.
3. Click Restart Now to restart the PC. Windows needs to reboot your PC to complete the installation process.
4. Done. Now, you can access your Hyper-V tools in Windows 8 Metro UI.
Using Hyper-V Manager to configure Virtual Machines.


Comments
Post a Comment